Showing posts with label row garden. Show all posts

Wednesday, July 1, 2009

One thing leads to another

A somewhat limited view of our garden area before there was a garden.


Despite what I said in my 'end of rope' post from a couple of weeks ago, things are going well. I had my little breakdown and as I normally do, I dusted myself off and got back to work. We've made some nice 'sanity saving' progress since then.

First of all, we have been slowly fixing things up around the house. I realized that having a half-done home makes me antsy, so this has definitely helped. My husband has also put some of his focus into getting the outside of the house fixed up, so he's been working on painting. This will be a big project for us this coming weekend (see to do list).

Lastly, we've shifted from predominantly planting to predominantly harvesting in the garden. As evidence of this, I present the following picture story....

First, we start with what you see in the above photo - a field.

Then we build boxes and fill them with dirt and seeds. Water regularly.


Wait a few weeks to get this:
The boxes are overflowing with greens! Swiss chard, kale, spinach, lettuce, mustard greens...


Which leads to this:

Freshly harvested and washed swiss chard

Which in turn, leads to this:
Swiss chard and artichoke dip

And this:
Swiss chard and tuna salad


And through a trade with friends for their abundant cherries, this:

My first ever cherry pie!


It was delicious, but I think I can do better and a different friend has promised me some sour cherries...so I'll get a chance to try again later this month.


In the meantime, we are working towards giving away or eating as much of our harvest as we can (much to the delight or pain of our digestive systems!) so that nothing goes to waste. When all else fails, I dehydrate the item and hope to find ways of using it later on when things are less hectic.


Towards that end, this is our tenative to do list for the coming long weekend -


Garden:
Harvest as necessary
Put up bean arch and cuke trellis
Transplant the last seedlings from the greenhouse
Add mulch from goat shed
Mow lawn

House:
Finish painting the trim
Scrape the eaves in prep for painting
Pressure wash anything not already done (including the deck)
Tape plastic over all "non-blue" items
Rent sprayer and paint everything not covered!
Order house numbers
Put up dining room lighting

Animals:
Worm goats
Clean out goat shed for mulch
Set up cross-fencing
Wash milking stand

Fun:
Definitely one and maybe two bike rides
Set off fireworks on Saturday

And that's it. Not bad for a three day weekend's worth of work, right? I'm confident that we can get all this done without too much headache.

Tuesday, June 2, 2009

Slammed with Spring

My appologies to all my readers for my absense. It's amazing how quickly life can fly by when you are busy, no? I cannot believe that it’s been almost a month since I last posted!
I’m not going to recap all that’s happened during that time but in summary: lots of planting , a little bit of harvesting, some dehydrating, some hair cutting, some eye surgery and some biking was had by our little household. And now for the photos:
One branch of my favorite plum tree - full of plums. We are going to have a bumper crop of these babies this year!


The 'row garden' area. The mess down the left is potatoes, in the distance you can see garlic, tomatoes and where the beans are planted (the fencing/trellis in the middle). The black covers to the right are the sweet potatoes.


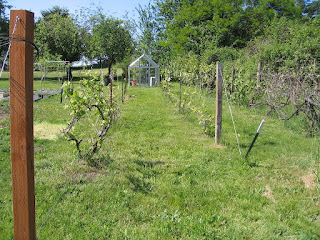
The grape arbors as they just start to show leaves (and a few tiny grapes) with our greenhouse at the end of the first aisle.


CD's hanging from twine to scare away birds. Garlic in the foreground, tomatoes behind. You can see how close our boxes are to the edge of the row garden, too (in the distance).


The field of boxes - mostly planted at this point. I need to add one more trellis for the cukes and plant a few random items, but these are pretty much done until mid-summer when we plant the fall items.


Thursday, April 30, 2009

Garden updates and escape artists

We got the garden almost completely done. I still need to add a low edging barrier at the ends of the aisles so that the rocks stay in and don't end up in the grass. We obviously still need to do some planting as well. See all the little plants at the far end? See how everything is nicely growing? Yeah...that was yesterday. Today, it's different. Read on and you'll learn why...


This is the area of the row garden that I hoed (is that a word?) and then covered with composted manure. It's ready for planting this coming weekend.

This is where my main herb garden will go. Or at least, where my initial one will be....I may have to expand to a sunnier area eventually. We will be adding a gate at the top of the steps and a fence pretty much at the front of this photo to keep the dogs out (they are the reason there is nothing else growing here anymore!).

Our potato experiment - growing potatoes in a garbage can! (holes drilled in the bottom for drainage).

Our garlic - doing very well. I'm excited! (I didn't check to see if its still there after today's little episode. I certainly hope so!

This is the 'early' apple tree. It was the first to ripen last year and now we see why...it's in full bloom before most of the other trees have any blossoms at all. Gorgeous!

This is Pepe. He's generally the instigator and likely the goat at fault for today's garden debacle.

And this is Oreo (at 4 weeks old). He probably didn't start the problem, but he definitely contributed to it.

My husband got home from a business trip today around 5 pm. He calls me at work and asks what happened to the garden. As I had just toured it this morning, I had no idea what he was talking about. I did see some evidence that our stupid cat is using the dirt as a litter box, but he usually doesn't disturb sprouted/growing plants. My H said that there were plants eaten, dug up, pulled out, etc. Small footprints in just about every box, too. I had no idea what to tell him but we were both ready to blame the cat.

I get home from work about an hour and a half later, and he says he knows what happened. Apparently, he spoke to our neighbors. I had told them that he was out of town for a few days, so when they saw our goats roaming our property, they thought something was wrong. They managed to get Sass back to the goat pen, only to find that the gate was still securely latched! We think that the kids managed to slip under the lower part of the gate and once they were out, mom had to follow along. She must have squeezed her big body out of the gate! Wherever Sass goes, Buddy has to follow - so now all 4 goats were free to roam. The only obvious damage was to the new plants in the garden. They destroyed about half our strawberries, most of the kale, some of the collards and all the celeriac leaves. They did not touch the celery (no surprise - they won't eat it when we offer it to them!) or the peas (thank goodness). The kids left footprints everywhere, so we think we'll need to resow all the seeds we planted, too. What a pain! I am glad that it happened now while we still have time to replant, though. We are super pleased that our neighbors took it upon themselves to help us out. I'm going to bake them something yummy as a thank you and take that to them with a fresh container of goat's milk this weekend.

This weekend's todo list? Neuter the kids, replant the garden, and rethink the goat gate!

Monday, April 27, 2009

Spring Gardening


I love this tree. It's some type of willow and it's just gorgeous when it blooms in the spring.

So much is blooming and growing around the farm! I'll take my camera out this evening (if it's not raining) and try to get some new photos. Spring is really a beautiful season. It's particularly exciting for us as we see things popping up that we have never seen before (this is our first spring in this house).

This weekend was a busy one. We had a goal of getting the garden done so that we could get lots of things transplanted outside. Time is running out on some of the spring veggies, so we didn't want to delay. I don't have updated pictures yet, but we got the balance of the garden boxes completed. We now have 5 boxes, comprising 200 square feet of gardening space. This 200 sf, took 120 cubic feet of soil to fill. This soil was 'made' by mixing peat moss, compost and pumice/vermiculite. To fill all the newly expanded boxes, we went and got a truckload of compost from a local nursery. Unfortunately (both for us and for our little truck), neither I nor the girl at the register, were confident enough in our calculations. For whatever reason, I was thinking that a cubic yard is equal to 9 cubic feet and so I used that to make our calculations. It wasn't until we got home that I realized that we had purchased 54 cubic feet of compost instead of the needed 18. Ooops. Now we have some compost to ammend the row garden area as well. See, I was planning ahead! ;-)

With a lot of sweat and hard labor, the soil got mixed and loaded into the boxes. The last truckload of river rock got filled into the aisles between the boxes. Part of the row garden area got hand weeded and then covered with some of the extra compost. The rest of the garden will be done as the week progresses and that huge pile of aged dairy poo sitting in our yard will eventually dwindle.

We planted brussels sprouts, broccoli, cauliflower, turnips, more spinach, mustard greens, kohlrabi, a few left over onions, kale, celery, celeriac, a few more strawberries, chinese cabbage, and more peas. Tonight I'll be starting melon, multiple types of winter squash, and pumpkins. Next week, lettuce and carrots get planted. We are also planning out the row garden area. This will house predominantly, potatoes, corn and beans...but also some tomatoes, some green beans, some lettuce or other greens (in the shade of the bean trellis) and probably some winter squash. Right now, our greenhouse is full of tomatoes, peppers and some early started melons (in pots). We also have our two dwarf citrus trees out there and they are doing really well (navel orange and meyer lemon).

I'm pretty sure that we are making a classic mistake in that there is little doubt in my mind that we are overdoing this. I know that come late summer and early fall we will be innundated with fruits and veggies. Somehow, in the dark of early spring, that is just too hard to comprehend so we over-plant. At least this year, I hope to have family visiting in the summer. They get to help us harvest AND eat our bounty! Anyone else up for a visit? I'm sure the apple harvest could use more hands (and mouths). :-)

Thursday, April 16, 2009

Garden Progress

This is what our 'field of boxes' looked like last year after our initial planting.

This is what they looked like as I began the long, tiring process of moving them this spring. You can see how the grass was a problem at the edges - it spilled over into the boxes pretty badly as well.

This is what they look like now - about 75% of the way completed. The first three boxes have all been planted (peas, spinach and strawberries).

Last year, we planted 8 square foot gardening boxes and about 1/3 of our row garden area. This year, that's changing. We didn't plant as much as we wanted to last year because we got into the house late in the growing season, and really ran out of time to plant and still hope to get harvest before winter. Mid-July is waaaayyyy too late to be planting when you live this far north (cold winters or not - you run out of daylight before the plants mature!).

We also had a real problem with keeping the grass in the pathways between the boxes under control (despite my planning the aisles the width of two lawn mower passes). The aisles were too wide as well, creating a lot of wasted space. This year, I planned out how I wanted them to be arranged and the best way to make the move (it's not easy since they have only weedcloth on the bottoms) before tackling the task. We also liked how the base of our greenhouse turned out so well that we decided that we wanted to use river rock in the walkways. This will allow water to still soak into the ground, but it will discourage the grass and make foot travel to the boxes easy.

We still need a couple of loads of rock and to mix up some more soil before we are complete, but it's coming along nicely. I also will need to reinstall the trellises, but that's quick and easy. They are currently all stored in our shed and installing them means only to insert 1/2 inch rebar into the ground in the right locations and then to drop the trellis over the rebar (the trellises use 1/2 inch electrical conduit for their frames).

This area is parallel to our row garden area in which we've only planted potatoes and garlic so far. The row garden area will also house some beans, corn, some winter squash, and the quinoa. We may also duplicate some of the other items we have set up for the boxes just to see which items do best in which location. I purposely wanted these boxes to be in the same general area as the row garden because depending on what the future holds, we may eventually want to fence them both in to keep the chickens out (currently the chickens only free-range in the goat area to keep them safe from the neighbors dogs). Luckily (knock on wood), we don't have a deer problem like so many of our neighbors do. We think that the 8 foot buffalo fence that surrounds us on two sides and the 6 ft privacy fence on the third side really discourages them. Four dogs in our two acres (between ours and our neighbors) and a road where nighttime speeds exceed 70 mph - and we are pretty well protected from deer as long as there are other more easily ravaged gardens to keep them happy. ;-)

Wednesday, January 14, 2009

Worms, worms, everywhere!

Row garden area (with the coop sitting on part of it). All sections of it are now covered with well-watered cardboard.

I never thought I'd be so excited about worms! To a small gardener, they are signs of good things happening.

First of all, as displayed (half completed) in the above photo, we have our row garden area covered with cardboard. Basically, most of our veggie garden this past year was done using the square foot gardening method. We will continue to use this method for some plants, but since we have a good sized, previously tilled area set aside by the previous owners for a row garden, we are going to use that this year as well. Last summer, we did a few rows of corn and one of potatoes, but that's about it. This year, our plans are much bigger. We won't be using traditional rows so much as 'patches' but we will be planting in rows within those patches. To prep the soil, we did two things. One the left, we covered the area tilled last year with black plastic. This was to kill all weed seeds with heat. We have left it there all winter primarily due to laziness, but partially to keep the weeds at bay. We have so much water, that pleny of moisture is still getting under the plastic, so we should be good to plant this spring. This area was not planted at all this past season.


The rest of the area has been picked clean and pooped on by the chickens, and then covered with either rotting leaves or used hay from the goat shed. On top of this, we then layed out cardboard and weighed it down. We chose cardboard for 2 reasons. 1. It will block the sun and not allow weeds to grow, but it will still allow water/moisture and air to get into the soil so that the 'mulch' layer will decompose. and 2. we had tons of it from the move...so it was free. ;-) Last weekend, we were peaking under the sections that have been there for a month or more and not only is all the mulch nicely decomposing, but the area is crawling with worms and other creepy crawlies! Yay! Busy, inhabited soil is healthy soil. We can't wait to see what we can produce this year! The plan is to pull up the cardboard, let the best pieces dry for future use, and toss the rest into the compost pile. We don't want to leave it where it is when we plant, or it will disturb the nitrogen balance in the soil.

The second population of worms that I'm happy about are our own doing. About a month ago, my H ordered a small herd/flock/mass/pride/pack (what do you call a group of worms?!) of worms so that we could start our own vermicomposting. Basically, this is using worms to eat garbage and then using their castings (poo) as fertilizer. Worm castings looks like the richest, most beautiful soil you've ever seen...so it's not gross and yucky at all. Plus, a well-managed worm bin won't smell at all, so it's totally suitable to small spaces (even apartments!). When H first got the worms, he just put them in a bucket with some bedding (moistened shredded paper) and some food cast-offs. This past weekend, we decided to improve their home and when we dug under the cover paper - they were already going to work on what we had left for them!


Anyway, we started with two rubber/plastic bins. We put two plastic tubs in the bottom bin to keep the top bin from seating all the way down.
Then we drilled holes in the top bin. Drain holes in the bottom and air holes around the lower part of the sides as pictured here...


We then put down a layer of shredded paper (lightly moistened with water) on the bottom and them spread out the 'garbage' and worms from the previous bucket. You can see a couple of the worms surrounded by starter soil and castings in this photo:


Then we covered all the 'garbage' with more shredded paper, moistened it, and put the cover on the bin to keep out light. The whole contraption is sitting in my husband's office (the warmest room in the house at about 65 to 70 degrees).


This is the worm bedding in the bottom of the two bins. The photo of the completed worm bin turned out blurry - but it looks an awful lot like this one only a bit more 'full'. ;-)


So, all we have to do now is to keep feeding the worms our bio-waste and keep them moist and happy. We'll be able to 'harvest' the castings when we are ready to start our next round of seeds and all summer long to use in 'compost tea' or for supplementing the soil in the garden.

Sunday, November 30, 2008

Sunday Projects

We had a nice long list of projects to complete today, but to be reasonable, we prioritized them and expected that not everything would get done.

First order of business was to skim some more milk. We now do about 8 quarts at a time as I just don't have the storage containers for more than that. We moved the separator from the workbench in the basement up to the 'desk' in the kitchen. This made a HUGE difference in the 'dread factor' as the process is MUCH easier when it's in the kitchen and I won't be dreading the next batch when the time comes. Bascially, we have to warm the milk up to 100F. I do this while my H assembles the unit. Then while he's turning the crank, I pour 4 quarts of HOT water into the feed bowl. As H turns the crank, this water flows through the unit to heat up all the machinery.


Hot water running through the machine to warm it up for the skimming process.


Then, once all the water is out, I pour the warmed milk into the feed bowl. When the crank is turned at a consistant speed, we get cream out one spout and skimmed milk out the other. While this is going on, I have to keep track of how full each contatiner is getting so that we don't overflow anything. We end up with 2 half gallon ball jars of skimmed milk, one half gallon pitcher and a little more than a quart of milk to freeze. We also get about 2 cups of fresh cream. The last batch went towards making butter (which is delicious) and this batch will go towards making ice cream later this week.

Milk getting separated: skimmed milk on the right, cream on the left


We also had 'working on the chicken coop' on our list for today. While I cut a pattern for a light floor out of cardboard, my H began work on building nesting boxes. We have 12 chickens, so we need 3 boxes (4 per box). We suspended the boxes in the coop so that they were essentially using 'wasted' space. We are also going to put down a heavy duty cardboard floor next weekend. We are waiting because we are still 'collecting' the chicken poop for the garden. Once we move it off the garden, we'll install the floor and fill it with shavings. This will allow the coop to get a little warmer now that winter is moving in quickly. The floors will not be permanent, so come next spring, we can remove them and start the rotation around the yard once again.

Nesting boxes - filled with pine shavings and ready for eggs!

Lastly, I continued work on winterizing our row garden area. We've already covered the entire area with quite a bit of chicken poop by methodically moving the coop across it, one week at a time. Then we covered each poop-laden area with either soiled hay from the goat shed, or with leaves from the apple trees. Lastly, we are laying cardboard over everything. We figure that this will allow moisture to soak in, but it will retard the growth of grass and weeds. In the spring, we'll remove the cardboard and get to planting.

Row garden area: back left is covered with black plastic from last summer (to kill weeds), back right (near white posts) is garlic planted under pine straw mulch. The front left is where the coop was last - still needing straw or leaves before we cover with cardboard. Right front is the area that we covered today.